The .brushset format is designed for iPad. Unlike individual .brush files, a .brushset contains an entire library of brushes in one folder.
How to Install on iPad
1
Download & Unzip:
If your brushes came in a .zip file, tap it in the Files App to unzip it first. Locate your .brushset file.
2
The “Open In” Method:
Tap and hold the .brushset file, select Share, and then tap the Procreate icon.
3
Direct Import:
Open Procreate, tap the Brush icon (Library), tap the + sign in the top right of the list, and select Import.
Pro Tip: Your newly imported brushes will always appear at the very top of your Brush Library list. Drag the set down to reorganize it.
Managing Your Brushes
Reset PointsPressure CurvesGrain Settings
To edit a brush, simply tap on its name inside Procreate to open the Brush Studio. Here you can tweak the Apple Pencil pressure sensitivity and tilt settings.
Note: .brushset files are only compatible with Procreate and Procreate Dreams.
All the tools you need are built into Photoshop. That may seem like a collection of niche tools for super advanced users, but once you start using them, it’s impossible to go back to more basic image editors. If you need (or want) the best, then at ten bucks a month, Photoshop is most certainly worth it.
Is Photoshop hard to learn?
No, learning the basics of Photoshop isn’t that hard and won’t take you much time. … This can get confusing and make Photoshop seem complex, because you don’t first have a solid grasp on the fundamentals. Nail down the basics first, and you’ll find Photoshop easy to use.
Learn the Basics of Graphic Design First. It is easy to take graphic design for granted. …
Get to Know the Photoshop Workspace. Adobe itself will take you around the workspace in Photoshop. …
Adobe Lightroom is a behemoth of photography software with enough functions and processes to make any photographer crazy. At the simplest level, though, Lightroom was created to help you do just three main things: sort your photos, post-process them, and export them. On Photography Life alone, we already have more than 100 articles about Lightroom — the equivalent of several books — and other websites have countless more. Clearly, it is an important topic to learn, whether you are just starting out or you are an advanced photographer. In this comprehensive guide, we will go over the process of using Lightroom for beginners, from start to finish, including tips on the topics that tend to confuse people the most.
This comprehensive article lays out all the basics, and it is divided into several different sections to make things easier to read. If there’s a specific term that you’re trying to find in this article, you might want to press Control F (or, for Mac, Command F) on your keyboard. If you’ve never used this shortcut before, it’s very useful, since it lets you search a webpage by the keyword you want.
Also, you can skip to the various parts of this article by clicking on the options here:
My goal was to write a tutorial that lays out everything a beginner needs to know about Lightroom, whether you have an older version (anything before Lightroom 6, such as Lightroom 4 or Lightroom 5) or the newest version (Lightroom 6 or Lightroom CC).
Hopefully, even if you start without any knowledge at all, you’ll end up with a medium- to high-level understanding of Lightroom’s most important concepts. So, it’s a long article.
Feel free to bookmark this page for later reference if you find some of these tips to be useful. Lightroom can be overwhelming at first, and the purpose of this guide is to simplify everything as much as possible.
What is Lightroom?
Lightroom is a post-processing and photo organization software. It lets you sort your photos, edit them, and export them at whatever size you need. Let’s dive into each of these three main functions:
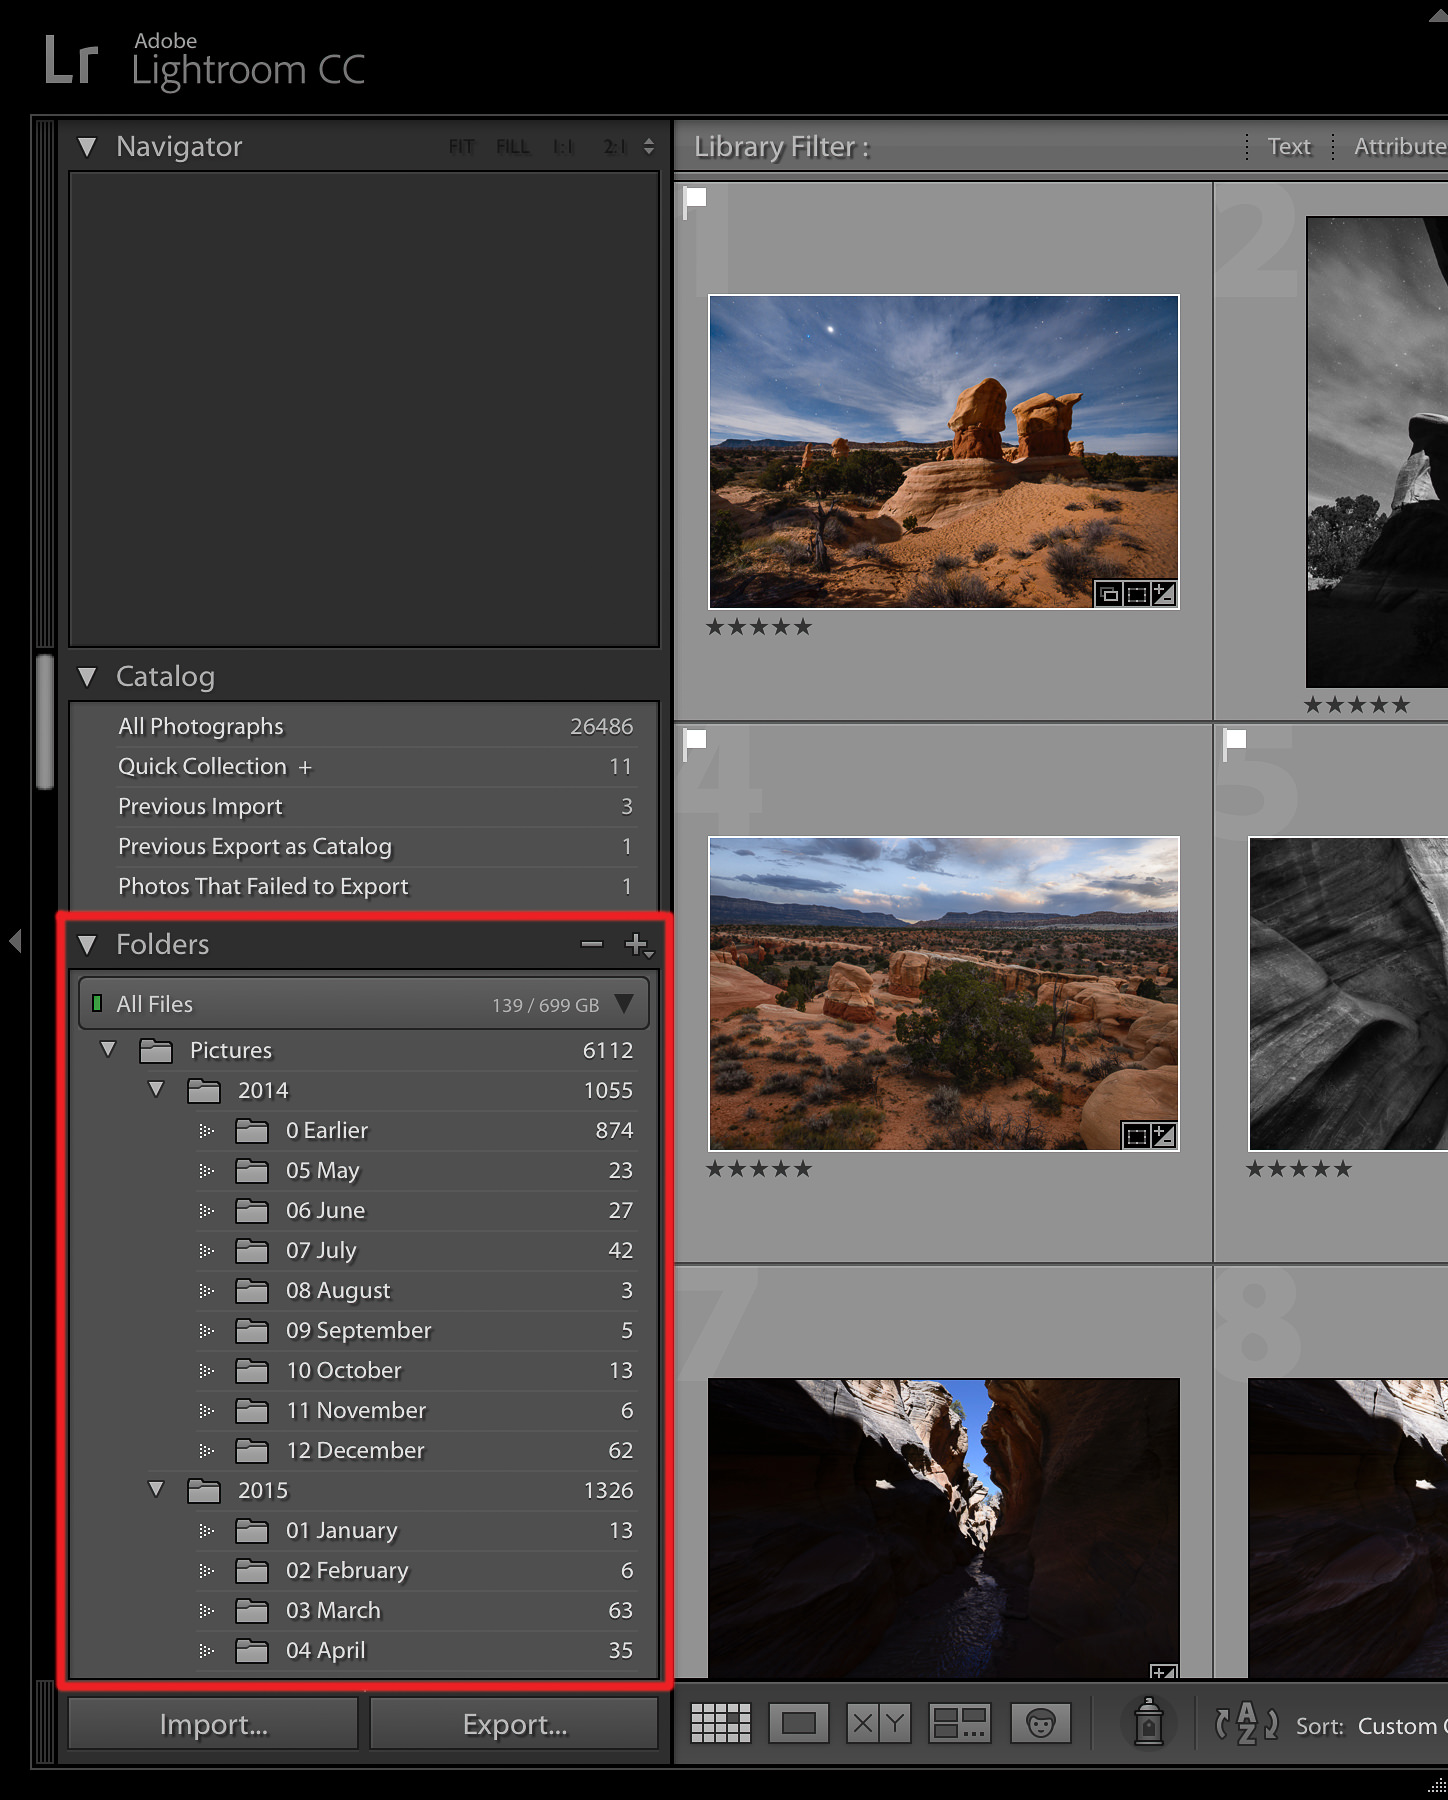
The most obvious thing that Lightroom does is help you sort and organize your photos.
Each time you import images into Lightroom, you’re also seeing where they’re located on your computer (i.e., the file structure). This appears on the left-hand side of your screen. So, you might see something like this:
The photos that are already on your computer don’t automatically show up in Lightroom. If you want to add some of your photos to Lightroom, or you want to add an entire folder of photos, you’ll need to import them. I’ll cover more about the Import Dialogue later; it’s not something you need to know in detail yet.
Beyond simply telling you where your photos are located, though, Lightroom has many other ways to sort and organize your photos.
What if, for example, you take a photo that you particularly like, and you want to find it again in the future? Is there some way to mark it that makes it easy to locate later?
Of course! There are countless ways to do so. You could give it a five-star rating, you could flag it, you could add it to a “Best Photos” collection, and many more. Later on, I’ll go into detail about these different options, and how you can use them to sort and organize your photos however you want.
For now, just know that Lightroom is one of the main programs — in fact, the most popular one on the market — that photographers use to organize and sort their photos.
Editing Your Photos
Lightroom isn’t all about sorting your photos, though. Most importantly, it also lets you edit the photos that you take.
Lightroom doesn’t offer the same vast range of post-processing edits that other software options, such as Photoshop, do. Still, just because it isn’t as extensive doesn’t mean it’s not extensive enough. Many photographers can get by seamlessly with Lightroom’s post-processing features; personally, although I do own Photoshop, I use it more for graphic design work than photo editing.
Lightroom’s post-processing options cover all the main bases: brightness, contrast, color, sharpness, and many more adjustments. This also includes the ability to apply local edits — i.e., adjusting certain parts of the photo selectively, while leaving the rest untouched.
In short, Lightroom was designed to edit your photos. This isn’t simply a side feature that you can use from time to time rather than editing the photo in Photoshop; it’s intended to be the main tool you use for post-processing.
Exporting Your Photos
Most likely, you’re already somewhat familiar with the idea of exporting your photos.
Say, for example, that you’re trying to email a set of several photos to one of your friends. Since Gmail and other email services tend to have a file size limit — something like 25 megabytes — you may not be able to send full-resolution photos. One way around that is to shrink the file size of the photos that you send. Rather than 4000-pixel photos at 0% compression, you could send 1000-pixel photos at 20% compression instead.
That’s one of the things Lightroom does well. If you need to resize a photo for email (or anything else), it is easy to export a photo at whatever settings you want.
Exporting doesn’t delete the original copy of your photos. If you export a 500-pixel copy of a photo, it’s just that — a copy. It will have a different file name (or file type) from your original photo, and you can delete/modify/send it however you want without affecting the real version.
(In fact, if you try to export a photo in Lightroom without changing its name, location, or file type — something that normally would override the original — Lightroom won’t even let you.)
I export photos all the time: When I enter photo contests, text photos to people, upload images to my website, and so on. I just right-click on the photo in Lightroom, go to Export > Export, and pick all the settings I want for my final photo.
This isn’t the most well-known thing that Lightroom does, but, in the long run, you’ll end up exporting your photos all the time.
What Makes Lightroom Different from other Software?
This is one of the top questions I hear about Lightroom, and with good reason. Lightroom does not work how you might expect, and, in a few crucial ways, it is vastly different from other options on the market, including software like Photoshop.
Case in point: When you make a change to your photo in Lightroom, that change only shows up in Lightroom.https://7d17de4c5e84d03b44c1bdae45fcb9b2.safeframe.googlesyndication.com/safeframe/1-0-37/html/container.html
What do I mean by this? Say that you brighten a photo in Lightroom. You might be surprised to realize that, if you open the photo in any other software, it won’t look any brighter than normal. The actual, underlying file is totally unchanged.
This is a fundamental part of Lightroom, and it’s not a feature you can disable.
So, if Lightroom makes it impossible to actually edit your photos, and the edits are only visible in Lightroom, why would professionals ever use it?
In fact, this system has a lot of benefits.
First, to address the main concern most people have: Yes, there is a way to see your Lightroom edits outside of Lightroom. What is it? You already know the answer — exports.
When you edit a photo in Lightroom, the edits do only show up in Lightroom. However, when you export a photo — which, as I mentioned earlier, is one of the three most important things you can do in Lightroom — all the edits are present in the photo you’ve exported.
So, you can edit a photo all day in Lightroom to look exactly how you want, but you won’t see any of the changes if you open the file outside of Lightroom. The fix is simple: Re-enter Lightroom, right-click, click Export > Export, and export the photo how you want. The exported copy of the photo now has all the edits you just made. It doesn’t replace the original file, which is still sitting happily on your computer. Instead, it creates an entirely new photo, complete with all the export settings you chose (file type, pixel dimensions, compression, file name, and so on).https://7d17de4c5e84d03b44c1bdae45fcb9b2.safeframe.googlesyndication.com/safeframe/1-0-37/html/container.html
Why is this better than simply editing the actual, original photo? There are a few reasons, but here’s the big one: This type of editing is non-destructive. You’re never changing anything about your original file at all. (There are only three settings within Lightroom that do affect the original: renaming the photo, moving the photo to a new folder on your hard drive, and deleting the photo from your disk.) Lightroom makes it essentially impossible to accidentally ruin anything beyond repair.
The same cannot be said of, for example, Photoshop. If you open one of your photos in Photoshop, crop it, save the photo, and exit, your photo will be permanently cropped. There are ways around this — specifically, unchecking the “delete cropped pixels” option and saving as a PSD file — but this isn’t an intuitive fix. It’s far too easy to edit the original photo by mistake. (See Photoshop vs Lightroom for more differences.)
Lightroom is great precisely because you’re never touching the original file. Lightroom is non-destructive editing software, and that is a critical feature for almost every photographer.
What is the Lightroom Catalog?
As you read about Lightroom, you’ll hear one term a lot: catalog.
Lightroom is a cataloging software.
What does that mean? In fact, this is exactly what I covered in the prior section: Lightroom doesn’t actually touch your photos.
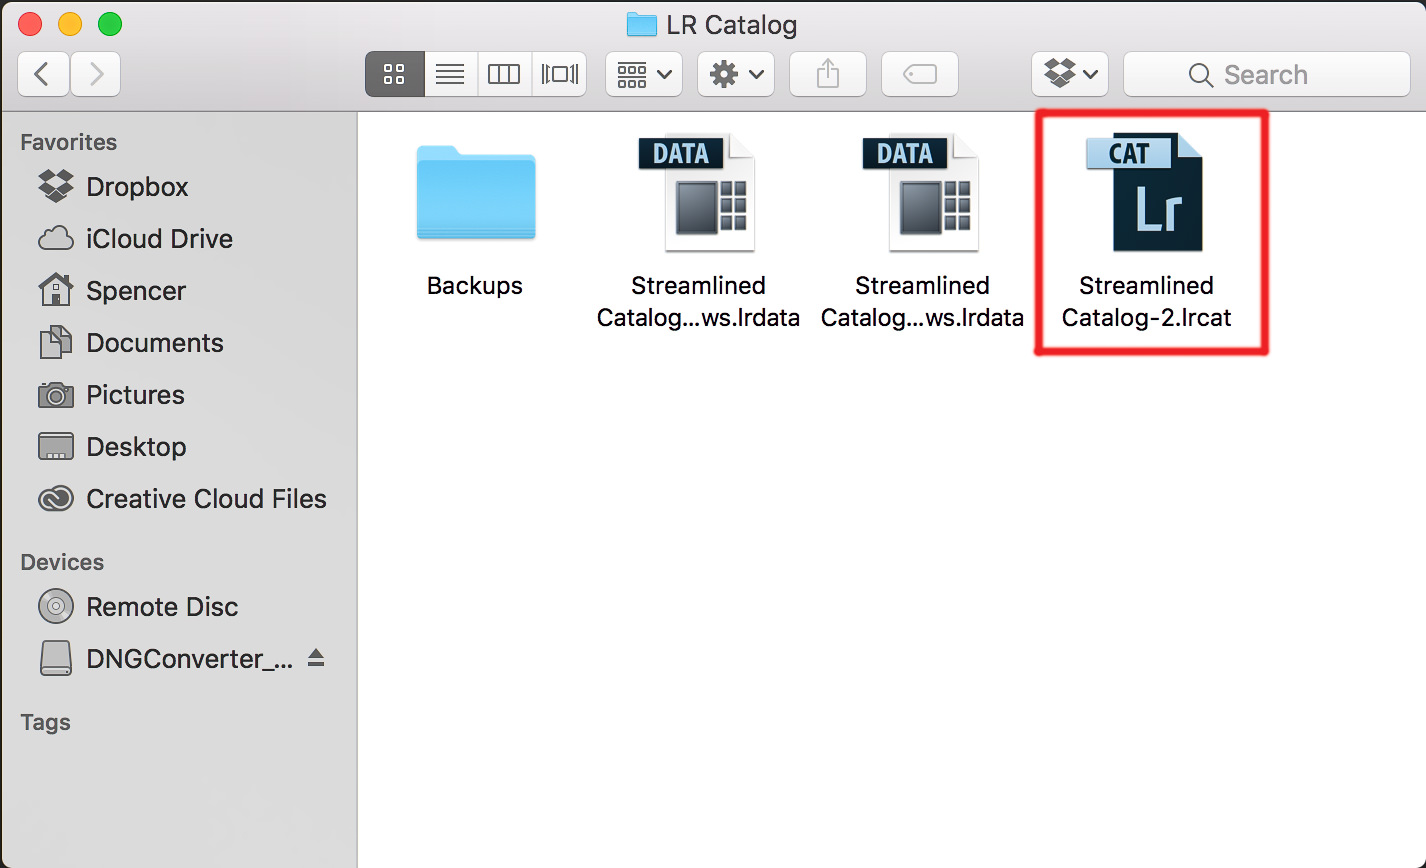
Every single edit that you make to a photo; each five-star rating you give; every time you add a photo to a collection — all of those changes are stored somewhere other than the actual photo on your computer. Where? The Lightroom catalog file.
The Lightroom catalog is one file that contains each change and adjustment you make to every single one of your photos. It also doesn’t take up too much space on your computer; my Lightroom catalog file is only about 300 megabytes in size, yet it contains all the edits to each of my thousands of photos. Not bad!
The Lightroom catalog gets more and more complicated as you learn about it in-depth. If you want to use multiple catalogs, send a catalog of photos to someone else, or use the same catalog on multiple computers, things can be very tricky. I recommend reading our full article on Lightroom catalogs if you’re trying to do anything complicated, and our article on using Lightroom with multiple computers.
Luckily, you probably don’t need to do any of that yet. If you just want to add photos to a single Lightroom catalog, you already know enough to start.
By default, the photos on your computer (or memory card) won’t be a part of your Lightroom catalog — so, you need to add them yourself. How do you do this? To add a photo to your Lightroom catalog, you need to start at the Import Dialogue. Click to the next below, and we’ll cover that process.
It used to be so simple to buy Lightroom. Every couple of years, Adobe would release a new version for photographers to buy outright, or to upgrade their existing copy.
Now things are a bit more complicated…
If you’re confused about whether you can still buy Lightroom 6 outright, or whether to buy Lightroom Classic as a subscription, this is the guide for you! EDITOR’S CHOICE
Lightroom Photography Plan
Great features, regular updates, cloud storage, multi-device functionality – the Photography Plan is the most popular way to get Lightroom.CHECK CURRENT PRICE
Be warned, though – if you’re looking for one of the last remaining copies of standalone Lightroom, you may be disappointed…
However, all is not lost – keep reading on to see why you may change your mind and end up happily paying for a monthly subscription, just like me.
Table of Contents
Best Way to Buy Lightroom in January 2021
IMAGE
PRODUCT
FEATURES
Photography Plan (1TB)OUR #1 CHOICE
1TB Cloud StorageLightroom on Desktop + MobilePhotoshop on Desktop + iPadAdobe Spark & Portfolio
The Photography Plan (1TB) is the best way to buy Lightroom in 2021.
It’s what I (and thousands of other photographers) use every day to edit, backup, sync and share photos.
Here in January 2021, photographers can only use the latest version of Adobe Lightroom by paying monthly or annually as part of a subscription plan.
These ‘Photography Plans’ include online cloud storage space for your photos to be backed up, shared, and edited remotely on desktop or mobile devices.
Also bundled into the main photography plans is Adobe Photoshop, which can be used on the desktop and more recently via an incredible iPad app.
While there are several other good alternatives to Lightroom, none of them offer the same seamless multi-device integration, and no editing software comes close to the power of Photoshop.
Whether you’re a professional or an amateur photographer, or simply someone who just wants to make your photos look their best in the least amount time, Adobe Lightoom is still the best photo editing software.
Still having trouble deciding how to buy Lightroom? Keep reading…
How to Choose a Lightroom Photography Plan
Being able to edit and share your photos on a phone and tablet is incredibly liberating.
In this guide, I’ve done my best to simplify the ways you can buy Lightroom, so you can choose the most appropriate Photography Plan for your needs.
I’ve been using the software for over 10 years, and have recently published an in-depth Lightroom review. I’m definitely qualified to recommend to you the best options 😉
I’ve ignored the ‘Lightroom Only’ and ‘Photoshop Only’ plans since they don’t represent the best value for money.
(I’m actually confused as to why Adobe would even offer them!)
Most photographers should choose the ‘Photography Plan 1TB’ option, which is the exact plan I’ve been paying to use for over 2 years.
With 1TB of online storage space, the excellent Photography Plan 1TB lets you backup and sync approximately 20,000 RAWs or 200,000 JPEGs across your desktop and mobile devices, giving you the ultimate in editing freedom and peace of mind.
If you’re on a tighter budget, the ‘Photography Plan 20GB’ option is great value for money too, and you can always upgrade your storage space to 1TB later on.
(20GB allows you to store and sync approximately 400 RAWs or 2,000 JPEG images.)
Then there’s the ‘All Apps Plan‘, which is popular with photographer-designers, and other creative professionals who need access to the entire suite of Creative Cloud apps.
(This includes Adobe Illustrator, InDesign, Premiere Pro, Premiere Rush, and a total of over 20 creative apps.)
If you’re a Student or a Teacher, great news! You can get a 70% discount by using this link.
Finally, if you’re part of a team, school or university, there are various other ways you can take advantage of the entire Adobe Creative Suite – more info on that here.
Occasionally Adobe offers discounts on its most popular Creative Cloud products.
Lightroom’s new Creative Profiles are one great reason to pay for the subscription version of Lightroom.
As of April 2019, Adobe Lightroom is only available as part of the Creative Cloud subscription. Lightroom 6 standalone is no longer available to purchase.
Initially, I was annoyed about this, but the more I used the subscription version, the more I understood why Adobe had made this decision.
I’ve been using the Lr Classic CC (and Lr Mobile) for a few years now, and I’m confident to recommend it to all photographers. If you’re still using the standalone copy of Lightroom 6, I strongly recommend you consider upgrading.
There are several significant pros of paying for Lightroom on one of Adobe’s subscription plans.
With the extra money generated since Adobe switched to its subscription models, they have invested a lot into making Lightroom much better.
Here are the main benefits:
1) You get the fastest, most optimized version of Lightroom
This is essential for most people. Lightroom Classic CC launches faster, generates previews faster, imports and exports faster, switches between modules faster, and generally feels much snappier than previous versions of Lightroom.
There’s still admittedly room for improvement, but for the average user, it’s plenty fast enough.
2) All of the most recent cameras are supported
If you own any camera released after Dec 2017, you need to buy Lightroom Classic CC to be able to edit your photos.
I bought a Sony a7III earlier this year, and so I had to stop using Lightroom 6 and upgrade to their subscription plan.
Most photographers need their new cameras to be supported by Lightroom.
3) You get all the latest Lightroom features
This is a huge benefit. Creative Profiles, Expanded Tone Curve, Profile Management, Coloured Labeling, Folder Search, Range Masking, Boundary Warp… these are all incredibly useful features that you’ll use every day, and they simply won’t ever be available unless you buy Lightroom Classic CC (see all features here).
For example, the ‘Textures’ slider in the Lightroom Develop panel allows you to smooth or enhance textures in photos without destroying finer details or adding noise.
It’s genuinely a really useful tool which I find myself using to clean up noising high ISO images.
Controlled adjustments for shadows, midtones and highlights with Color Grading
Feaster editing with new performance improvements
Tethered Live View for Canon
Scan, focus and navigate using Enhanced Zoom
Lightroom Classic V9.2 (February 2020)
Improved RAW default settings – streamline your edit workflow with custom default import settings for RAW file images.
PSB file support – Import, catalogue and edit large PSB files.
Support for new cameras – Fujifilm X-T4, Canon 1Dx Mark III, Leica M10 Monochrom, etc.
Support for new lenses – Hasselblad, Huawei, LG, Mitakon, etc.
Other enhancements – choose monitor for secondary window, Auto Sync improvements, Photoshop Elements 2021 support, GPU Accelerated Editing for Lens Correction and Transform, eGPU Empowered Enhanced Details for macOS 10.15.
4) You get Lightroom CC (Lightroom Mobile)
Being able to sync and backup your imported photos to the cloud, then use a mobile device to cull, rate and edit photos is incredibly liberating.
You can also use Photoshop CC to perform more fine-tuning on your images via your iPad, all from the cloud – very impressive.
I love the ability to create an online gallery of images to share in just a few clicks, using the Albums feature of Lightroom CC and the included Adobe cloud storage space.
Also, thanks to Apple iOS13, Lightroom Mobile is finally able to import photos from your camera directly to the Lightroom app, bypassing the camera roll.
This ‘direct import’ feature is a huge time saver to what was once a rather clunky process. Also added to the update are multiple export options, including options for the file type, pixel dimensions, compression and watermarks,
The Lightroom Mobile app is 100% free to download and use whether you’re a paying Creative Cloud subscriber or not.
However, its functionality is limited, meaning some key features are only available to subscribers (see below), and you can’t take advantage of cloud syncing of your images across devices.
5) You get Photoshop CC (Photoshop on iPad)
The latest version of Adobe Photoshop now supports a fully completely mobile workflow, meaning that you can start editing a PSD on your desktop, have it saved to the Adobe cloud automatically, then continue editing on your iPad.
While anyone can download the Photoshop iPad app for free, it’s only with a Creative Cloud subscription that users can take advantage of all the cloud syncing benefits, and this is what makes it so powerful.
(If you’re confused at to why you might need both software, check out Lightroom vs Photoshop.)
Can you Buy Lightroom 6 Outright?
In February 2019, Adobe stopped offering the standalone Lightroom 6.
For a few weeks, it was still possible to grab one of the last remaining copies on Amazon, but they all seem to be sold out now.
Aside from that, there may be the odd copy floating around the Internet, or you might even still be using Lr6 on your computer today.
However, as of May 2019, Adobe Creative Cloud no longer offers customers access to older versions of Lightroom and Photoshop.
Cons of Using Lightroom 6 (i.e Not Upgrading)
Useful features such as Range Masks are NOT available in Lightroom 6
I’ll admit it – I held off upgrading from my outdated standalone Lightroom 6 software for almost a year.
Along with many other photographers, I felt angry at Adobe for forcing users into their subscription model and refusing to keep creating Lightroom standalone products.
If you own any of the previous versions of Lightroom, I understand your annoyance too…
After all, why should you have to pay a monthly subscription on top of the price you’ve paid for the original software?!
Just in case you do find one of the last remaining copies of Lr6, just consider the reasons below why buying Lightroom 6 outright may not be a good idea.
1) You won’t have the fastest, most optimized version of Lightroom
This is a huge con of buying Lightroom 6 in 2021. Why pay for software that’s outdated, and will run slower and slower over time?!
2) You’ll be stuck using older cameras
Lightroom 6 won’t be able to edit any photos taken with cameras released after Nov 2017*. Why limit yourself to old technology – there are so many new and exciting mirrorless cameras being released!
(*You can still use the Adobe DNG Converter, but it’s a rather clunky workaround for every single time you import images from newer cameras into LR6.)
3) You won’t have all the latest features
Perhaps you don’t think you need the latest Lightroom features, but trust me, when you see what more you can do to your photos with the latest updates, you’ll want them eventually!
4) Limited Lightroom CC/Mobile Functionality
The premium features that are missing from the free version of Lightroom CC (Mobile) are numerous and considerable:
Cloud Storage
Sync Presets & profiles
Healing
Selective Adjustments
Sensei Search
Geometry
Editing Raw Photos
Sharing Web Galleries
Sort your People Photos
These are all are invaluable features for many photographers, and using an older standalone version of Lightroom means you can’t take advantage of any of the,.
Being able to cull, organise and even edit photos on a tablet is incredibly liberating, not to mention a lot of fun. Cloud storage (backup), and ability to create a shareable album within seconds, are both incredible useful features too.
In addition, Sensei Search is Adobe’s AI-powered photo search feature – it’s particularly exciting to see how this will improve over the coming months.
5) No Photoshop/Photoshop for iPad Mobile Workflow
You’ll have to decide for yourself whether these are issues or not, since not everyone needs this software.
However, even if you think you may not need Photoshop, I must admit that for any image edits that simply aren’t possible in Lightroom, it’s still a great piece of software.
Just as there are lots of great Lightroom tutorials all over YouTube, the same is true for Photoshop, so getting up to speed isn’t too hard.
Also, the ability to work seamlessly across desktop computer to iPad with Photoshop CC really is impressive, and a real game-changer for mobile creatives.
How Much does Lightroom Cost?
You used to be able to buy Lightroom 6 (the non-subscription version) from Amazon… but no longer 🙁
Obviously, if you still manage somehow to buy Lightroom outright as a standalone product, there’s only one cost to you.
With the various Adobe Photography Plans, however, the actual cost of Lightroom to you the photographer is a little vaguer.
Let’s try and put the cost a Lightroom subscription into perspective…
Obviously, you can’t predict how long you plan to use Lightroom, but let’s assume you’ll use it for 1 year (then reassess and see what other options have appeared in that time).
On the Photography Plan with 1TB of Cloud Storage, you’ll have spent a total of about US$232 after a year.
Yes, it’s obviously more than a Lightroom 6 purchase (assuming you even manage to find one!), but how relevant is this to you?
Is the cost of Lightroom Classic CC (as a monthly subscription) justifiable to you?
If you’re a professional, using the latest version of Lightroom is a necessity. You owe it to yourself and to your clients to use the best version of a software, which will also support the latest camera technologies.
In addition, having access to Photoshop for those photos you can’t edit completely in Lightroom is also essential as a working pro.
The premium features of Lightroom CC (‘Mobile’) are also really useful to so many photographers – the ability to import RAW files straight from your camera into an iPad, then make selective adjustments just by tapping the screen and have all edits synced back to your main computer – it’s like magic!
The Adobe Photography Plan is a cost of doing business as a photographer in 2021, and for the huge benefits, I’m happy to deduct is as an expense to my photography business.
But how about if you’re an amateur photographer or even a beginner? Is it still worth paying Adobe each month for the privilege of using their software? Well yes, I think so.
Even if you’re not a professional photographer, a subscription to Lightroom is incredibly useful and liberating. Photographers of all standards can benefit enormously from the latest image editing and cloud syncing technologies.
Despite the emergence of this AI-powered image editor I still believe paying for the subscription version of Lightroom is still the number one option.
How to get a Lightroom Discount
The Adobe Student Discount is the cheapest way to get all the Adobe Apps.
Occasionally, Adobe decides to give a discount on Lightroom and its Creative Cloud products.
If you don’t mind waiting, you can keep checking this link to see if there are any good offers.
Another option is if you’re a student or a teacher (check eligibility here). If eligible, you can save up to 70% on Creative Cloud products using this link.
Finally, it’s worth mentioning that you can download Lightroom to trial from here, and have a play around with the other Adobe products too.
How to get an Adobe Student Discount
As mentioned above, if you’re a student or a teacher, you can save a up to 70% on a Creative Cloud All Apps plan using this link.
This can mean a huge reduction of US$52.99 to $19.99 a month! This is a generous offer from Adobe, in an effort to support anyone in full time education and encourage the development of creativity.
(You didn’t hear it from me, but there are ways to take advantage of the Adobe Student Discount… even if you’re not a student or teacher!)
I don’t want to spell it out for you here, but let’s just say it’s easier than you might think – head over and get a little ‘creative’ with your application 😉
How to get a Creative Cloud All Apps Discount
If you aren’t a student or teacher, you can use this Adobe Photoshop Lightroom discount to save 15%.
Adobe is kindly offering all Shotkit newsletter subscribers an exclusive 15% discount on the first year of the Adobe CC All Apps plan.
If you’re a multi-discipline creative, a production agency, or even just someone who requires more than just the Photography Plan, the All Apps Plan is by far the most cost-effective way of getting everything you need.
I’m a huge fan of the cross-device video editing app Adobe Premiere Rush CC, so in order to get the most out of it, I needed to upgrade to the All Apps plan (since I already subscribe to the Photography Plan).
There are 20+ Adobe apps that I’ll be able to take advantage of, including apps that have nothing to do with photography, e.g. Adobe Acrobat and Dreamweaver.
To get the 15% discount for yourself, just sign up to the free Shotkit weekly newsletter here and you’ll gain access to a coupon code in the exclusive member’s area.
How to get Lightroom with Photoshop
A source of some confusion is just how users can get Lightroom with Photoshop – it’s not immediately apparent that when subscribing to the one of the Creative Cloud Photography plans, you also get Photoshop included.
If you opt for the Photography Plan + 1TB of Cloud Storage like me, you get Lightroom with Photoshop, as well as the other features mentioned previously (see the top of the article for more info).
Finally, with the Creative Cloud All Apps, it’s pretty self-explanatory – you get Lightroom, Photoshop, and all the other Adobe Creative Cloud apps.
(This option is for power-users or agencies which require their employees to have access to everything.)
Free Adobe Lightroom Download Warning
I imagine some people reading this post will be searching for ways to get an Adobe Lightroom crack, or trying to uncover a free Lightroom download. I won’t lie – many moons ago I tried to do the same thing!
You might find success on certain shadier sites, but I’d strongly recommend you steer clear of anything but the genuine Lightroom from the Adobe website, or a reputable dealer.
Whether you’re a professional photographer or an enthusiast, you definitely shouldn’t be entrusting all your most precious memories to a dodgy copy of Lightroom.
Anything could happen, from a corrupted database to images displaying differently – the latest cameras may not even be supported.
In summary, please do the right thing. Do NOT download Lightroom from any source other than Adobe.
I know it’s nice to get software for free, but it’s far better to pay a little money for software that helps you achieve your goals, particularly if that software is frequently updated with useful features.
Adobe Lightroom trial
Adobe offers a free 7 day Lightroom CC Trial
The one official way to get a ‘free’ version of Lightroom is via the Adobe Lightroom Free Trial, which is only available on the Adobe website here.
The only drawback is that you only get 7 days to have a play around with the software, but at least it’s a fully functional version of Lightroom CC with all the latest updates.
You can convert your free trial to a paid Creative Cloud membership during the 7 day period, or after the trial expires.
The Adobe Lightroom Trial works on both macOS and Windows – I recommend you give it a go if you’re in two minds about whether to upgrade your standalone Lightroom 6 copy to the subscription plan.
Frequently Asked Questions
Since writing this post, I’ve had a lot of questions regarding the various options available. Here are some answers to the most common queries:
How much is Adobe Lightroom?
You can purchase Lightroom on its own or as part of the Adobe Creative Cloud Photography plan, with both plans starting at US$9.99/month. Lightroom Classic is available as part of the Creative Cloud Photography plan, starting at US$9.99/month.
What is Adobe Photoshop Lightroom?
Sometimes Lightroom is referred to rather confusingly as ‘Photoshop Lightroom’. It is the same thing.
Can you Just Buy Lightroom?
No you cannot. Amazon and B&H Photo hasve sold the last remaining copies of Lightroom 6, so it’s unlikely you’ll be able to find it elsewhere.
Can I get Lightroom Free?
Only for 30 days 😉 Click here to download a free trial of Lightroom Classic.
Is Lightroom only available by subscription?
Lightroom Classic CC is only available by subscription. Lightroom 6 (the previous version) is no longer available to purchase outright.
Which is better Photoshop or Lightroom?
Lightroom is like a ‘lite’ version of Photoshop, but it also offers image organisation features that Photoshop lacks. One is not technically better than the other – they are intended to be used for different purposes, often in unison.
Typically, a Lightroom user will only use Photoshop to edit or manipulate images in a way that Lightroom cannot. Similarly, a Photoshop user will use Lightroom in order to organise, cull and add keywords to a library of images.
What is Adobe Lightroom used for?
Lightroom has two main uses – the first is as an image management software. The second is as an image editing software.
Is Lightroom CC free?
Yes, on mobile it is 🙂 You can download the app for iOS and Android devices, and use it for free to edit and share your images.
The desktop version of Lightroom CC isn’t available as a free, standalone product – it comes bundled with the Photography Plan, which includes Lightroom Classic CC and Photoshop CC.
What’s the difference between Lightroom Classic and Lightroom CC?
Adobe Photoshop Lightroom Classic CC is the renamed version of the original Lightroom application. It is optimised for desktop-focused workflows, including local storage of your photos in files and folders on your computer.
Lightroom CC is the new cloud-based photo service that works across desktop, mobile and web. Lightroom Classic CC is the desktop-focused digital photography product. Slightly confusing, right?! 😉
Is Adobe Lightroom Mobile free?
Yes, it’s 100% free to download the Lightroom CC mobile app onto your smartphone. However, there are certain features that are missing:
Cloud Storage
Sync Presets & profiles
Healing
Selective Adjustments
Sensei Search
Geometry
Editing Raw Photos
Sharing Web Galleries
Sort your People Photos
Some of these features are unnecessary for the average photographer, but others are genuinely very useful, e.g. RAW editing, sync presets and cloud storage.
The premium features are only available to users who subscribe to the Creative Cloud.
What happens to my photos if I cancel my Adobe subscription?
Lightroom CC: Adobe stores your original images for an additional year after your membership lapses. During this time, you can continue to launch Lightroom CC to download your original files from the cloud.
Lightroom Classic: You’ll still have access to all your photos on your hard drive through Lightroom Classic CC. You can continue to import and organise photos, as well as export your edited photos through Export, Publish, Print, Web, or Slideshow. However, access to the Develop & Map modules and Lightroom Mobile are not available after your membership ends.
Is there a Lightroom 7?
Nope! Lightroom 6 was the last stand-alone (i.e. non-subscription) version of Lightroom that could be purchased outside of a Creative Cloud membership… but now even that has been phased out.
All the advantages of Lightroom lie in the subscription versions, with regular updates, powerful new features and helpful support.
If you have any other questions, please leave them in the comments below so I can consider adding them to this list.
Final Recommendations
No one likes the idea of paying each month for a subscription… especially when that product or service used to be available as a one-off payment.
However, once you’re committed to buying Lightroom Classic CC, you’ll soon realise just how many huge benefits there are by paying for Lightroom in this way… whether you’re an amateur or a pro photographer.
Many believe that with the massive revenue Adobe has created by encouraging its users into this model, it is now more able to invest heavily into the improvement of Lightroom, Photoshop and every other creative program we all rely on.
As a Lightroom subscriber, I’m happy to keep paying the subscription fee, as I feel the benefits hugely outweigh anything else.
I hope this article has put some things in perspective for you too. Leave me a comment with your thoughts 🙂 EDITOR’S CHOICE
Lightroom Photography Plan
Great features, regular updates, cloud storage, multi-device functionality – the Photography Plan is the most popular way to use Lightroom.CHECK CURRENT PRICE
Disclaimer: All recommendations are impartial and based on actual user experience, with no bias to the products or the brand. The products in this post may contain affiliate links.
Adobe Lightroom is the most popular image editing software for photographers. This program can use the thousands of effects and presets available on the internet to expand its editing functions. In just a minute, we’ll take a look at the best of those presets.
Lightroom presets are important, because they help you to edit your photos in record time by doing a lot of the work for you. Simply apply a pre-defined effect on your original image to see its results. Then, if you don’t like the result, revert back to your original image at any time.
But, before we can even worry about presets, you’ll need to purchase and install Lightroom.
Once you’ve downloaded and installed Lightroom on your device, you can start browsing for presets. Here’s a step by step process on how to install Lightroom presets:
1. First, download the Lightroom preset(s) of your choice from the list below. Most presets come with a .zip extension. Unzip / extract the folder to see the .lrtemplate files inside.
2. Next, open Adobe Lightroom and import your photos.
3. Go to the Preset panel on the left side of the window. We recommend adding a new folder so that the presets will remain organized.
In order to create a new folder, right click on the presets panel.
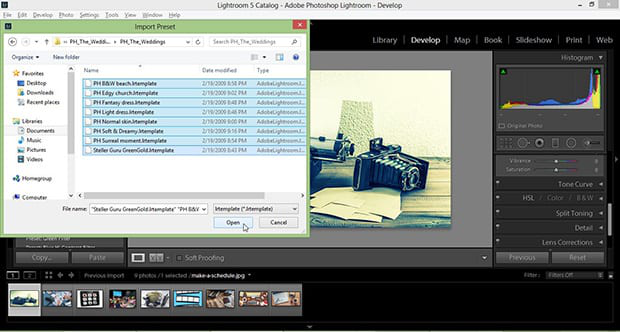
4. Once you have created the folder, right click on your custom created presets folder, and select Import.
A new window will pop up for you to locate your downloaded presets. Simply select the presets of your choice, and click on Open to import them to Lightroom.
This process will install your presets to Lightroom. Simple enough, right?
How to Apply Lightroom Presets to an Image
Now that you’ve installed your presets, how do you apply them to your photos?
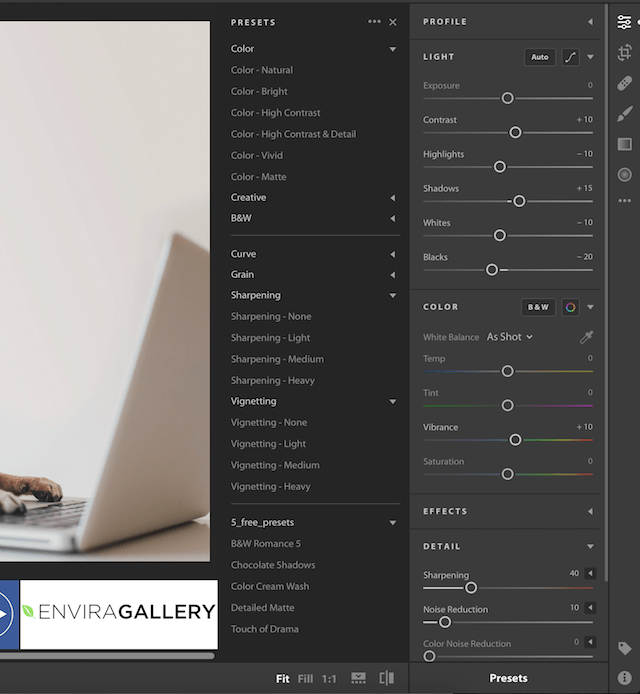
Navigate to the Effects section and click the Presets tab at the bottom. This will allow the Presets window to pop out.
Now you can select a preset, apply it to your image, and fine tune its settings!